Security
The Security module provides comprehensive access control and authentication management for EPMware. It implements a multi-tiered security model consisting of roles, modules, and security classes to ensure appropriate access to applications, dimensions, and functionality.

Security module showing the three-component model
Overview
The EPMware security model consists of three integrated components:
- Roles - Define functional capabilities (Requestor, Reviewer, Approver, Default)
- Modules - Control menu access and feature availability
- Security Classes - Manage access to applications, dimensions, and properties
These components are managed through:
- Users - Individual user accounts and authentication
- Groups - Collections of users for simplified management
- Security Provisioning - Assignment of access rights
- SSO Configuration - Single sign-on integration
- Report Security - Report and dashboard access control
Quick Links
Security Model
EPMware implements a comprehensive security model that controls access at multiple levels:
Three-tier security model structure
Security Hierarchy
graph TD
    A[Users] --> B[Groups]
    B --> C[Security Provisioning]
    C --> D[Roles]
    C --> E[Modules]
    C --> F[Security Classes]
    F --> G[Applications]
    F --> H[Dimensions]
    F --> I[Properties]
    F --> J[Members]
Security Rules
The security engine applies these rules to determine access:
- Security Classes secure applications, dimensions, and properties
- Modules determine available menu options
- Roles dictate functions users can perform
- Inheritance - Security flows from bottom up:
- Member-level security → Dimension security → Application security
System-Defined Components
Modules and Roles are system-defined and cannot be edited. Only Security Classes are user-configurable.
Roles
Roles determine the functional capabilities available to users. Each user must be assigned at least one role.
Available Roles
Requestor
Users who create new metadata requests: - Create and submit requests - View own requests - Cannot review or approve
Reviewer
Users who review metadata requests: - All Requestor capabilities - Review request lines within security access - Approve/Reject at review stage - Requirements: - Reviewer role assigned - Metadata module access - Assigned to review task or group - Request in "Pending Review" stage
Approver
Users who approve metadata requests: - All Reviewer capabilities - Final approval authority - Approve/Reject at approval stage - Requirements: - Approver role assigned - Metadata module access - Assigned to approval task or group - Request in "Pending Approval" stage
Default
Users without request management duties: - Read-only access - Metadata Explorer access - Report viewing (with permissions)
Request Snapshots
When a request is submitted, a snapshot of users and groups is bound to the request. Changes to workflow tasks don't affect pending requests.
Security Scope
Reviewers and Approvers can only act on request lines for which they have security access.
Users
The Users page manages individual user accounts for EPMware access.

Users management screen showing Native, LDAP, and SAML users
User Types
| Type | Description | Authentication | Management |
|---|---|---|---|
| Native | EPMware-managed accounts | Internal | Full control |
| LDAP | Directory service accounts | External LDAP | Read-only profile |
| SAML | Single sign-on accounts | External IdP | Limited management |
Managing Native/SAML Users
Add User
- Click the + icon
- Select user type (Native/SAML)
- Configure user details:

Add User dialog with configuration options
| Field | Required | Description |
|---|---|---|
| User Type | Yes | Native or SAML |
| Username | Yes | Unique login identifier |
| Yes | User email address | |
| First Name | Yes | User's first name |
| Last Name | Yes | User's last name |
| Password | Native only | Login password |
| Active | Yes | Enable/disable account |
Admin Email
Change the ADMIN user's email address to receive system notifications.
Edit User
- Right-click on user row
- Select Edit User
- Modify properties
- Click Save

Edit User properties dialog
LDAP Users
LDAP user properties are read-only and synchronized from the directory service.
Delete User
- Right-click on user row
- Select Delete
- Confirm deletion
LDAP Restriction
LDAP users cannot be deleted from EPMware, only disabled.
Group Management
View User Groups
- Right-click on user
- Select View Groups

View Groups showing user's group memberships
Assign Groups
- Right-click on user
- Select Assign Groups
- Move groups from Available to Assigned
- Click Save

Assign Groups shuttle window for group assignment
REST API Token
Configure tokens for on-premise agent authentication:
Generate Token
- Right-click on user
- Select Generate Token
- Click Generate button
- Save the 36-character token
- Click Save then Close

REST API token generation for agent authentication
Agent Requirement
At least one user needs a REST token for on-premise agent installation. See the Agent Installation Guide for details.
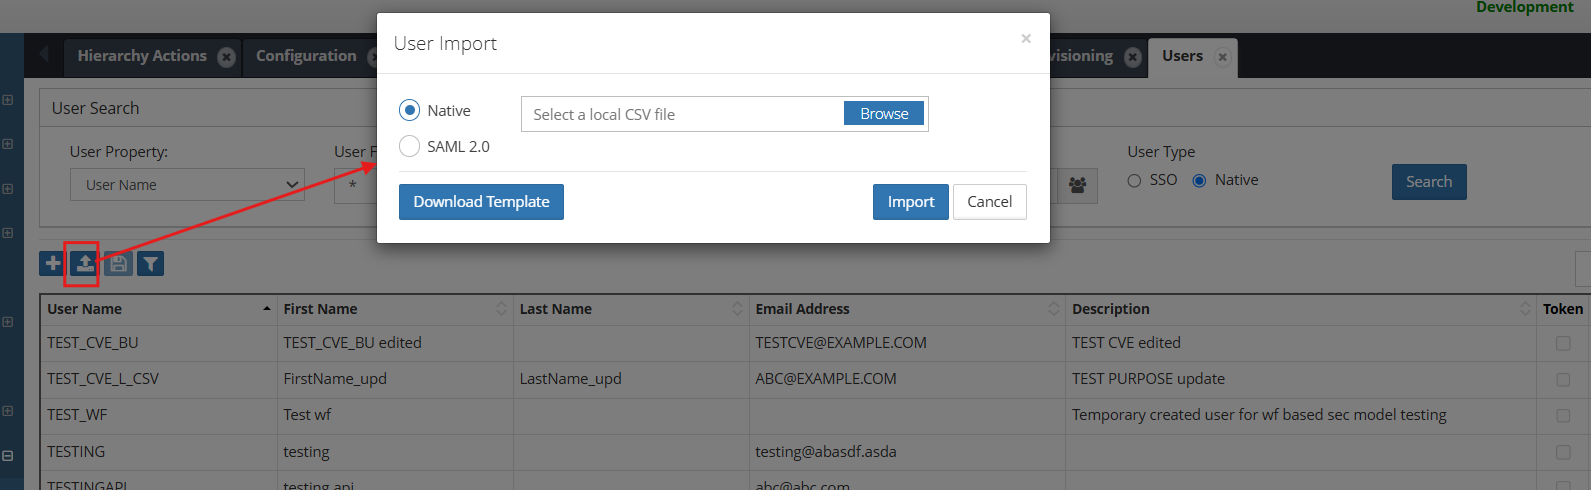
Upload Multiple Users
The Upload Users option allows users to load multiple users in bulk using a .csv template.
Note
- If a user in the upload file already exists, the system updates the corresponding user fields if any values have changed.
- If the user does not exist, a new user account is created.
- Invalid records are reported with appropriate validation messages.
Process
- Click on Upload Users option
- Select User type : SAML/NATIVE and Download the user upload template.
- Populate the template with user information -> upload the file -> Click Import.
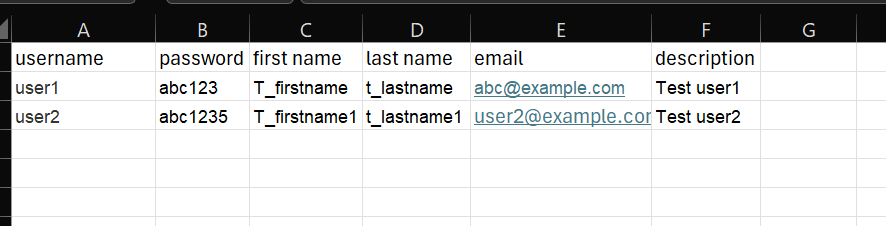
Template For Native User:
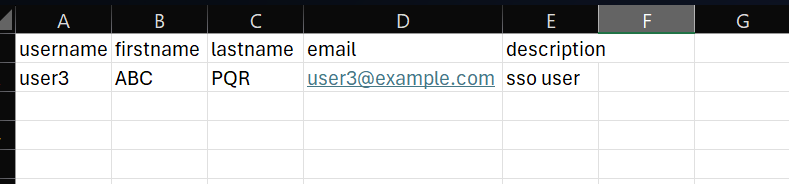
Template For SAML User:
Groups
Groups simplify security management by allowing bulk assignment of permissions to multiple users.
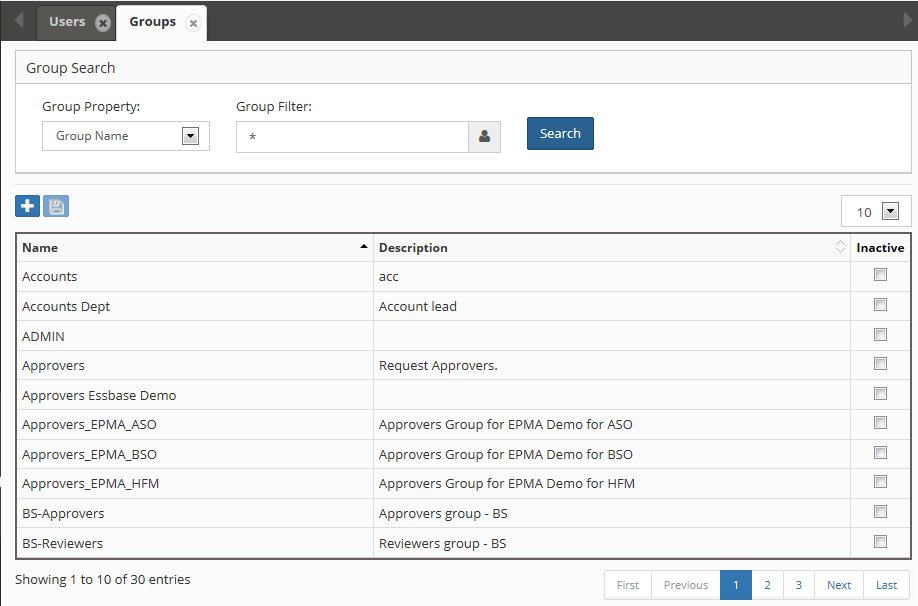
Groups management screen
Group Features
- Support Native, LDAP, and SAML users
- Can be active or inactive
- Inherit all assigned permissions
- Simplify provisioning management
Managing Groups
Add Group
- Click the + icon
- Enter group details:

Add New Group dialog
| Field | Description |
|---|---|
| Name | Unique group identifier |
| Description | Group purpose/members |
| Active | Enable/disable group |
Edit Group
- Right-click on group row
- Select Edit Group
- Modify properties
- Click Save

Edit Group properties
User Assignment
View Group Users
- Right-click on group
- Select View Users

View Users in group
Assign Users
- Right-click on group
- Select Assign Users
- Move users between Available and Assigned
- Click Save

Assign Users shuttle window
Upload Multiple Groups using file
The Upload Groups option allows users to load multiple groups in bulk using a .csv template.
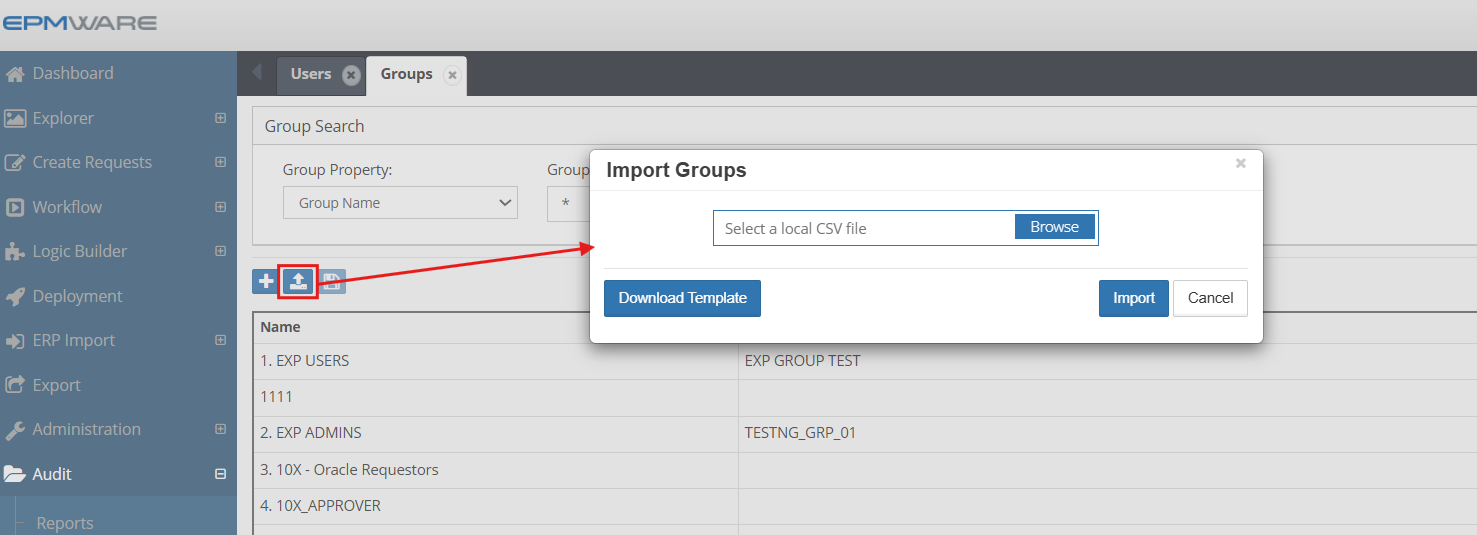
Process:
- Click on Upload Groups option
- Download the Groups upload template.
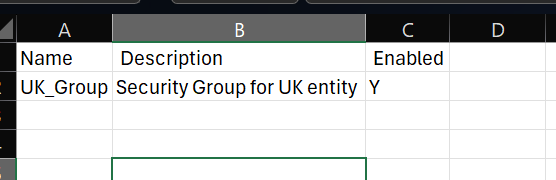
- Populate the template with the required group information.
- Upload the completed file and click Import.
- The system will validate the file and create or update the groups accordingly.
Security Classes
Security Classes provide granular access control for EPMware objects. Administrators create and assign these classes to secure various elements.

Security Classes configuration screen
Security Class Applications
Security Classes can be assigned to:
| Object Type | Configuration Location | Purpose |
|---|---|---|
| Applications | Application Configuration | Control application visibility |
| Dimensions | Dimension Configuration | Restrict dimension access |
| Properties | Property Configuration | Limit property editing |
| Members | System property category | Node-level security |
| Reports | Report Security | Report access control |
| Workflows | Workflow Builder | Workflow visibility |
Managing Security Classes
Add Single Class
- Click the + icon
- Enter class details:
- Name - Unique identifier
- Description - Purpose/scope
- Click Save
Add Multiple Classes
- Click the upload icon
- Select CSV file with classes
- Click Import
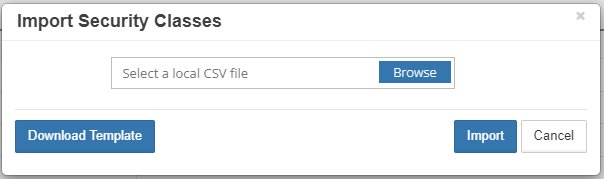
Import Security Classes dialog
CSV Format:
Name,Description
FIN_USERS,Financial application users
ADMIN_ONLY,Administrator access only
ENTITY_MANAGERS,Entity hierarchy managers
Member-Level Security
Apply security at the hierarchy node level:

Security Class property in member properties
Request Required
Member-level security requires a request to assign the Security Class property under the System category.
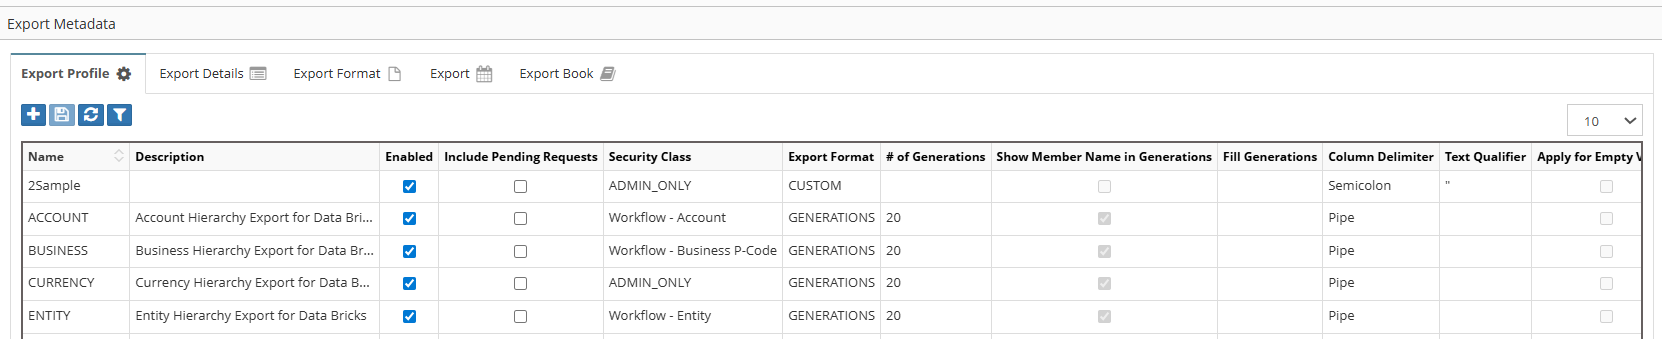
Securtiy Class Exmaple
In the example below, the export profile has security classes assigned. Only users whose groups are provisioned with the corresponding security classes will be able to access this export profile.
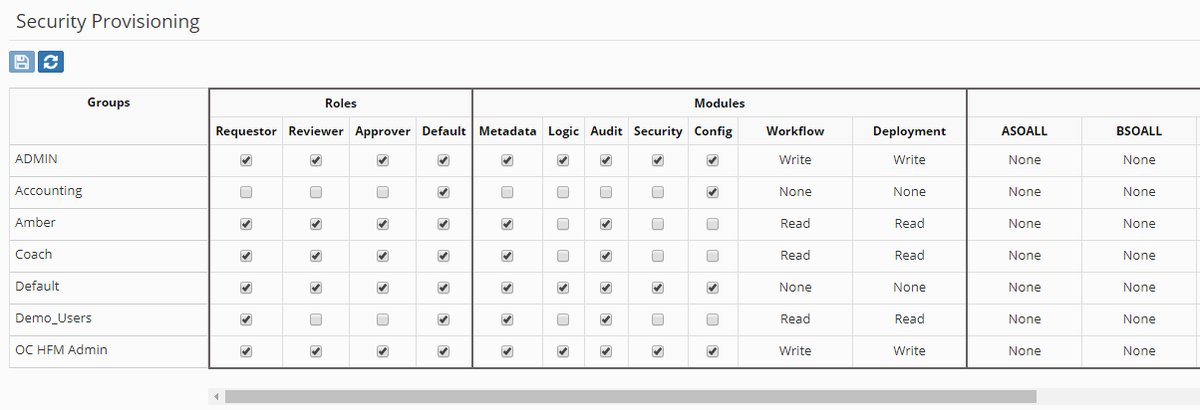
Security Provisioning
Security Provisioning assigns access rights by connecting Groups to Roles, Modules, and Security Classes.
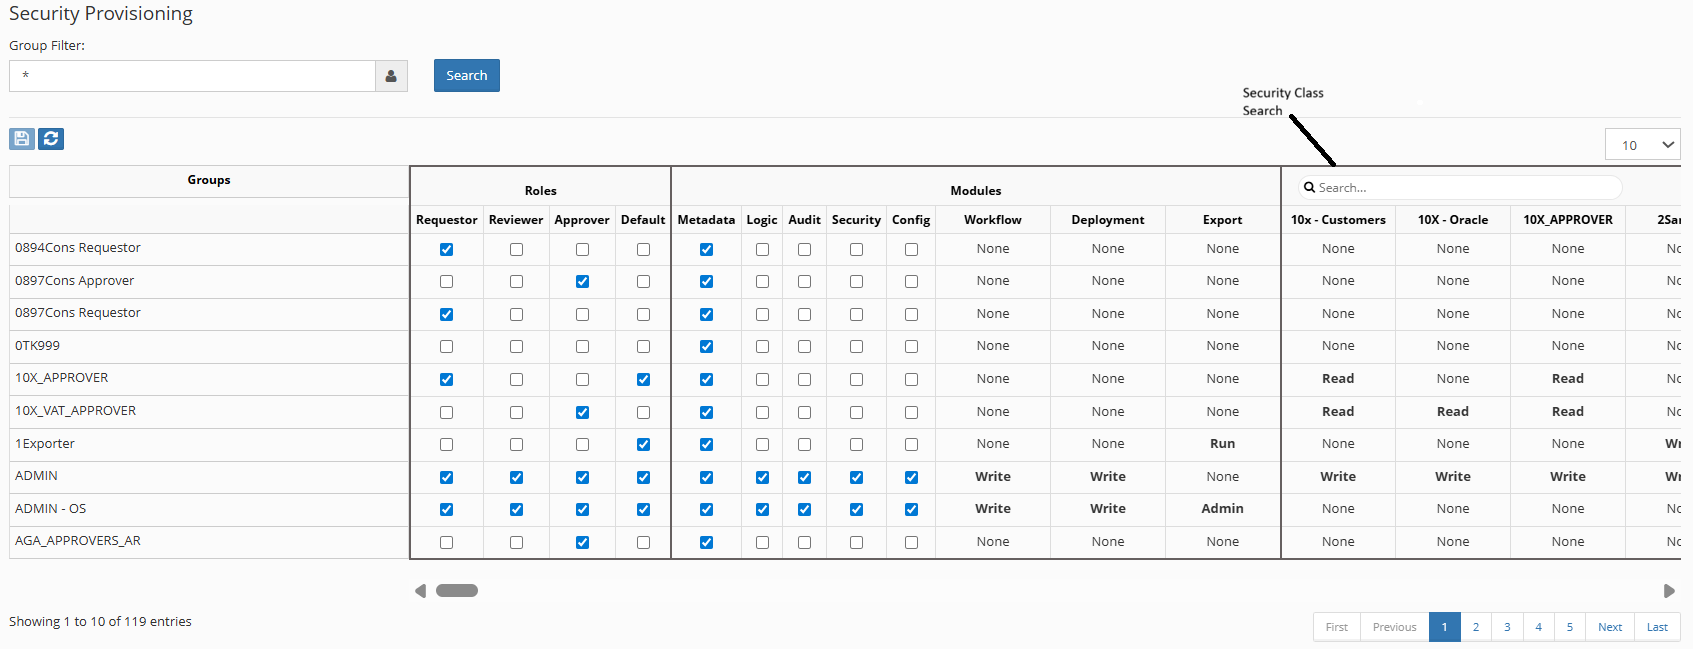
Security Provisioning screen showing the four-tier model
Provisioning Structure
The grid displays three column sections:
- Roles Section - Checkboxes for role assignment
- Modules Section - Access level dropdowns
- Classes Section - Read/Write/None dropdowns
Rows represent Groups created in Security → Groups.
Module Access Levels
| Module | Access Options | Controls |
|---|---|---|
| Metadata | Checkbox | Request creation/management |
| Logic | Checkbox | Logic Builder access |
| Audit | Checkbox | Audit report access |
| Security | Checkbox | Security configuration |
| Config | Checkbox | System configuration |
| Workflow | Read/Write/None | Workflow management |
| Deployment | Read/Write/None | Deployment operations |
| Export | Admin/Run/None | Export Module screens |
Security Class Permissions
Each Security Class intersection offers: - None - No access - Read - View only - Write - Full access
Provisioning Groups
- Search or navigate to group
- Select at least one item from:
- Roles (checkbox)
- Modules (checkbox/dropdown)
- Classes (dropdown)
- Click Save icon
Minimum Requirements
At least one selection from each tier (Role, Module, Class) is required for proper provisioning.
Menu Visibility
Navigation menu items only appear for modules assigned to the user's groups.
Security Precedence
Security privileges flow bottom-up:
Member Security → Dimension Security → Application Security
Higher-level security cannot override lower-level restrictions.
SSO Configuration
Configure Single Sign-On for seamless authentication via SAML or LDAP/MSAD.
SAML Configuration

SAML SSO configuration options
| Field | Description | Default |
|---|---|---|
| SSO Type | SAML or LDAP | SAML |
| Enabled | Enable or Disable configuration (It will fall back to Apache configuration if disabled) |
Y |
| SSO User Identifier | This attribute will be used from the response received after successful SSO Login for the User Identification. | User_ID |
| EPMware User Identifier | User information from the client's SSO response attribute will be matched with EPMWARE User Name OR Email address to determine SSO User | Username |
| SHA Algorithm | SAML Secure Hash Algorithm type Valid values are SHA256 OR SHA-1 | SHA256 |
| SAML Metadata XML File | Upload SAML Metadata XML file. “Download Metadata File” button to download your XML file if previously uploaded. | Upload file |
| EPMware SAML File | Use this link to download EPMWARE SAML Metadata file | Download link |
SAML Setup Steps
- Upload IdP metadata XML file
- Download EPMware SAML metadata
- Configure IdP with EPMware metadata
- Map user attributes
- Test authentication
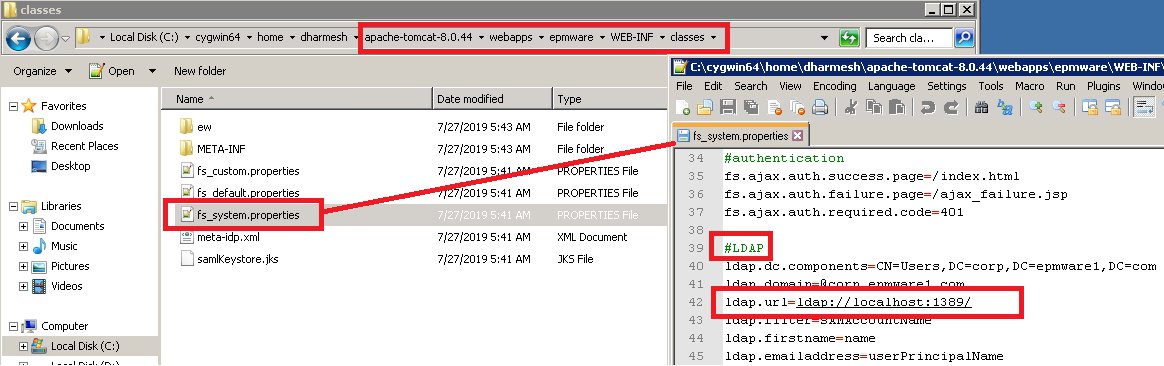
LDAP Configuration

LDAP authentication configuration
LDAP Properties
Configure in property files:
- fs_system.properties
- fs_custom.properties
MSAD Configuration
If you are using MSAD as the User Authentication Directory type and if you are using a secured port, for example port # 636, then you may need to import MSAD certificate into Apache Tomcat. For more information, refer to standard documentation of Apache Tomcat.
Note
In the EPMWARE Apache folder, LDAP configuration will need to specify “ldaps” rather ldap.
Port Configuration
If client is using MSAD without SAML then users can specify port # for MSAD in the fs_system.properties file OR fs_custom.properties file.
Error reported in Apache is
javax.naming.PartialResultException: Unprocessed Continuation
Reference(s); remaining name 'DC=xxx,DC=xxx,DC=xxx,DC=com'
It is possible that LDAP port is blocked and not SSL enabled. In this case use port 3269 instead of 636 or 389.
Tomcat Apache EPMWARE Property file examples:
***Standard LDAP port (No certificate is needed) ***
***Secure LDAP port (Certificate needs to be imported in EPMWARE Tomcat Apache) ***
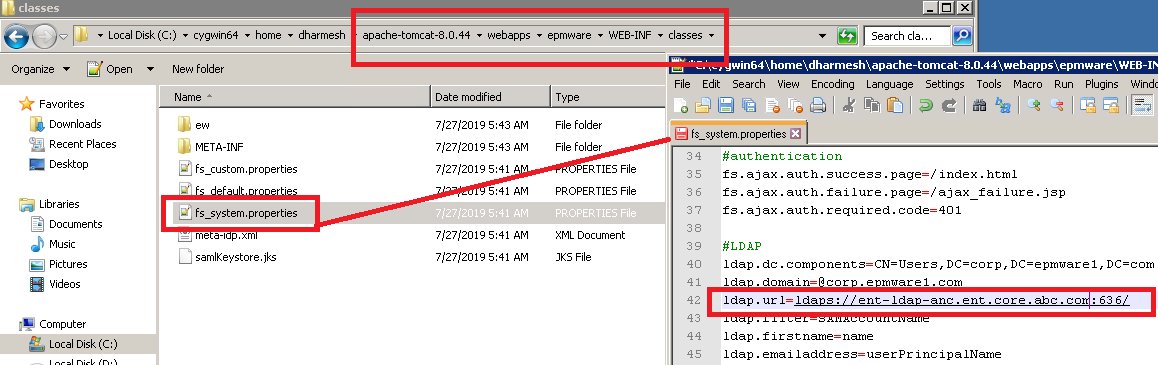
Certificate Required
Secure LDAP requires importing the MSAD certificate into Apache Tomcat.
Common ports:
- 389 - Standard LDAP
- 636 - Secure LDAP (SSL)
- 3268 - Global Catalog
- 3269 - Secure Global Catalog
Report Security
Control access to reports and report groups in the Audit module.

Report Security configuration showing security class assignments
Securing Reports
Assign Security Class
- Right-click on report or group
- Select Edit Properties
- Choose Security Class from dropdown
- Click Save
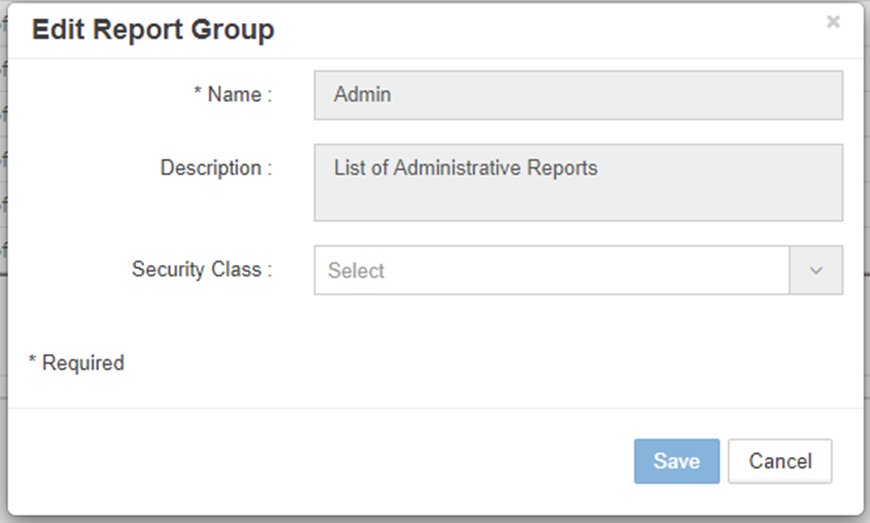
Edit Properties dialog for report security
Remove Security Class
- Right-click on report or group
- Select Edit Properties
- Click x next to Security Class
- Click Save
Report Access Flow
- Assign Security Class to report/group
- Provision Security Class to groups
- Users in groups gain report access
Best Practices
1. User Management
- Unique Usernames - Enforce unique identifiers
- Email Verification - Validate email addresses
- Password Policy - Implement strong passwords for Native users
- Regular Audits - Review active users quarterly
- Disable vs Delete - Disable inactive users rather than deleting
2. Group Strategy
- Functional Groups - Organize by business function
- Hierarchical Structure - Create parent/child relationships
- Naming Convention - Use descriptive, consistent names
- Documentation - Maintain group purpose descriptions
- Regular Review - Audit group memberships
3. Security Classes
- Granular Control - Create specific classes for different needs
- Meaningful Names - Use business-relevant identifiers
- Inheritance Planning - Design hierarchy-aware security
- Testing - Verify access in non-production first
- Documentation - Record class purpose and scope
4. Provisioning
- Least Privilege - Grant minimum required access
- Role Separation - Separate conflicting duties
- Regular Reviews - Quarterly access audits
- Change Control - Document provisioning changes
- Emergency Access - Plan for break-glass scenarios
Troubleshooting
Common Issues
| Issue | Cause | Solution |
|---|---|---|
| User cannot login | Account disabled or wrong credentials | Check active flag and reset password |
| Menu items missing | Module not provisioned | Verify module assignment in provisioning |
| Cannot see application | No security class access | Check security class provisioning |
| LDAP authentication fails | Wrong port or credentials | Verify LDAP configuration and ports |
| SSO not working | Metadata mismatch | Reupload IdP metadata and test |
| Report not visible | Missing security class | Assign and provision security class |
| Cannot approve request | Wrong role or stage | Verify approver role and request stage |
Authentication Debugging
LDAP Issues
# Enable LDAP debugging in fs_custom.properties
ldap.debug=true
ldap.trace.level=FINEST
SAML Issues
- Check SHA algorithm match
- Verify attribute mappings
- Review SAML response in browser tools
- Check time synchronization
Security Audit Queries
-- User group memberships
SELECT u.username, g.name group_name
FROM ew_users u
JOIN ew_user_groups ug ON u.user_id = ug.user_id
JOIN ew_groups g ON ug.group_id = g.group_id
WHERE u.active = 'Y' AND g.active = 'Y'
ORDER BY u.username, g.name;

-- Security provisioning by group
SELECT g.name, r.role_name, m.module_name, sc.name class_name, p.access_level
FROM ew_groups g
JOIN ew_provisioning p ON g.group_id = p.group_id
LEFT JOIN ew_roles r ON p.role_id = r.role_id
LEFT JOIN ew_modules m ON p.module_id = m.module_id
LEFT JOIN ew_security_classes sc ON p.class_id = sc.class_id
WHERE g.active = 'Y'
ORDER BY g.name;
Related Topics
- Workflow Tasks - Assign security groups to tasks
- Global Settings - Authentication configuration
- Application Configuration - Application security classes
- Dimension Configuration - Dimension security