ERP Import
The ERP Import module automates metadata import from ERP source systems into EPMware through configurable interfaces. It enables seamless integration with enterprise systems to maintain synchronized metadata across financial and operational applications.

ERP Import module showing Builder components
Overview
ERP Import provides automated data synchronization between source ERP systems and EPMware-managed applications through:
- ERP Import Builder - Create and configure import definitions
- ERP Import Mapping - Map source data to target properties
- ERP Import Monitor - Track execution status and troubleshoot
The module supports multiple integration patterns: - Interface table-based integration - File-based imports (CSV, Excel) - REST API integration (Cloud deployments) - Scheduled batch processing - Real-time synchronization
Quick Links
ERP Import Architecture
Understanding the ERP Import data flow helps in designing efficient integrations:
graph TD
    A[ERP Source System] --> B{Integration Type}
    B -->|Database| C[Interface Tables]
    B -->|File| D[CSV/Excel Files]
    B -->|API| E[REST Services]
    C --> F[ERP Import Builder]
    D --> F
    E --> F
    F --> G[Field Mapping]
    G --> H[Data Validation]
    H --> I{Validation Result}
    I -->|Pass| J[Request Creation]
    I -->|Fail| K[Error Log]
    J --> L[Workflow Processing]
    L --> M[Metadata Deployment]
Integration Components
| Component | Purpose | Location |
|---|---|---|
| Source System | ERP data origin | External |
| Interface Layer | Data staging | Database/Files |
| Import Engine | Processing logic | EPMware |
| Validation Layer | Data quality | Logic Builder |
| Request Engine | Change management | Workflow |
| Deployment | Target update | Applications |
ERP Import Builder
The Builder creates and manages import configurations that define how data flows from source systems into EPMware.

ERP Import Builder showing configured imports
Creating Import Configurations
Basic Configuration

Create ERP Import configuration dialog
- Navigate to ERP Import → Builder
- Click the + icon
- Configure import settings:
| Field | Required | Description | Example |
|---|---|---|---|
| Interface Name | Yes | Unique identifier | GL_ACCOUNT_IMPORT |
| Description | No | Import purpose | Monthly GL account updates |
| Application | Yes | Target application | HFM_PROD |
| Dimension | Yes | Target dimension | Account |
| Workflow Priority | Yes | Request priority | High/Medium/Low |
| Workflow | Yes | Processing workflow | Auto_Approval |
Advanced Settings
| Field | Default | Description | Impact |
|---|---|---|---|
| Partial Allowed | No | Continue on errors | Allows partial success |
| Enabled | Yes | Active status | Controls visibility |
| Ignore Records That Have Not Changed | No | Skip unchanged data | Reduces processing |
| Launch Workflow | Yes | Auto-start workflow | Immediate processing |
| Interface Table Name | ew_if_lines | Source table | Data location |
Script Integration
Configure pre and post-processing scripts:
| Script Type | Purpose | Example Use |
|---|---|---|
| Pre-Execution | Data preparation | Validate source data |
| Post-Execution | Cleanup/Archive | Move processed records |
Email Configuration
Set up notifications:
| Template | When Used | Recipients |
|---|---|---|
| Email on Success | Import completes | Administrators |
| Email on Error | Import fails | Support team |
File-Based Import
Import data from uploaded files instead of interface tables:

File upload for direct import
File Upload Process
- Click upload icon (📁) on import row
- Browse and select file (CSV/Excel)
- Click Upload
- System displays field mapping screen

Map file columns to properties
Supported File Formats
| Format | Extension | Requirements |
|---|---|---|
| CSV | .csv | Header row required |
| Excel | .xlsx, .xls | First sheet used |
| Tab-delimited | .txt, .tsv | Tab separator |
| Pipe-delimited | .txt | Pipe separator |
File Structure Example
MEMBER_NAME,PARENT,DESCRIPTION,CURRENCY,STATUS
100000,Total_Revenue,Product Revenue,USD,Active
100100,100000,Hardware Sales,USD,Active
100200,100000,Software Sales,USD,Active
100300,100000,Services Revenue,USD,Active
Cloud Deployment
EPMware Cloud uses REST API for file uploads, not direct database access to ew_if_lines table.
Managing Import Configurations
Edit Import

Edit import configuration
- Right-click on import row
- Select Edit Properties
- Modify settings
- Click Save
Delete Import
- Right-click on import row
- Select Delete
- Confirm deletion
Active Import Deletion
Cannot delete imports with pending executions. Complete or cancel active jobs first.
ERP Import Mapping
ERP Import Mappings are created and managed with the ERP Import Mapping screen. The Mapping screen maps the Interface table columns with the Request attributes for the EPMWARE application. The Request Header and the Request Line Items are then populated with the data from the ERP Import and the Request is now ready for Review and Approval.
Mapping Types
The system supports two mapping levels:
Header Mapping
This section will have a drop down list to select the ERP Import Name and radio button to select a Header Mapping or a Line Mapping.

Import mapping configuration interface
An ERP Import Mapping consists of the following components:
- Column Name - Interface Table Column Name
- Property Name - Only valid for Property Fields in Column Name
-
Mapping Type:
- Constant - Constant Value
- Derived - Calculated Value
- Import - Source Value
-
Custom Value - Input Custom Value
- File Header Column Name
To Create a Header Mapping :
- Select ERP Import name from the drop down
- Select Header radio button
- Select the "+" icon to display the Create Mapping popup box.
- Select an Column Name from Interface Table
-
Select a Mapping Type:
- Constant - Constant Value
- Derived - Calculated Value
- Import - Source Value
-
Input Custom Value if applicable
- Select Save to save the ERP Import Mapping

Header mapping configuration
Common Header Mappings:
| Column | Mapping Type | Value/Logic |
|---|---|---|
| REQUESTOR_USER_NAME | Constant | ADMIN |
| REQUEST_DATE | Derived | SYSDATE |
| DESCRIPTION | Constant | ERP Import for Products |
Line Mapping
Maps source fields to request line properties:

Line mapping configuration
To Create a Line Mapping:
- Select ERP Import name from the drop down
- Select Line mapping radio button
- Select the "+" icon to display the Create Mapping popup box.
- Select an Column Name from Interface Table
- Select an Property Name (Only Valid if Column Name is a Property)
-
Select a Mapping Type:
- Constant - Constant Value
- Derived - Calculated Value
- Import - Source Value
-
Input Custom Value if applicable
- Select Save to save the ERP Import Mapping
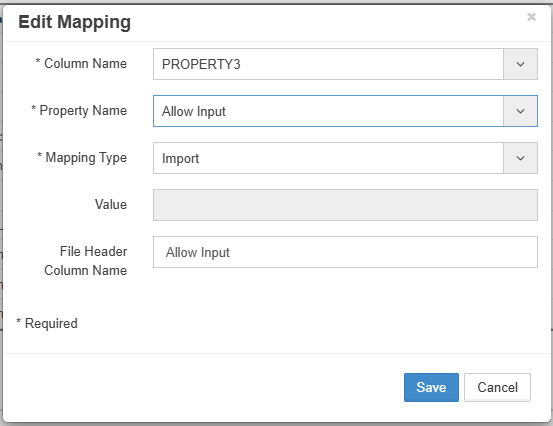
To Edit a Mapping:
- Right click on a row and select Edit Properties from the Menu to display the Edit Mapping popup box.
- Edit the properties as required.
- Select Save to save the changes.
Common Line Mappings:
| Source Column | Property Name | Mapping Type | Column Value |File Header Column Name| |--------------|---------------|--------------|-------------| | MEMBER_NAME | | Import | |MEMBER_NAME| | PARENT_MEMBER_NAME | | Import | |PARENT_MEMBER_NAME| | ACTION_CODE | | Import | |ACTION|
Mapping Configuration Process
- Select Import - Choose from dropdown
- Choose Level - Header or Line radio button
- Add Mapping - Click + icon
- Configure Fields:
| Field | Description | Options |
|---|---|---|
| Column Name | Source field | From interface table |
| Property Name | Target property | From dimension |
| Mapping Type | Transformation | Import/Constant/Derived |
| Custom Value | Static/Formula | For Constant/Derived |
| File Header Column Name | ERP file column header name | eg.MEMBER_NAME,ACTION |
ERP Import Monitor
Monitor tracks all import executions, providing visibility into status, errors, and performance.

Import monitor showing execution history
Monitor Grid
| Column | Description | Actions |
|---|---|---|
| Execution ID | Unique job identifier | Click for details |
| Name | Import configuration | Link to builder |
| Start Time | Execution start | Sort/filter |
| End Time | Completion time | Calculate duration |
| Status | Current state | Filter by status |
| Message | Status details/errors | View full text |
| Log | Detailed log | Download/view |
Execution Status
Status Types
| Icon | Status | Description | Next Action |
|---|---|---|---|
| ✅ | Completed | All records processed | Review requests |
| ⏳ | Pending | Queued for processing | Wait |
| ⚠️ | Partial | Some records failed | Review errors |
| ❌ | Failed | Import failed | Check logs |
| 🔄 | Running | Currently processing | Monitor |
Status Details
Click Execution ID for detailed information:

Detailed execution status popup
Note: The Status popup is displayed by clicking on the Execution ID in the Monitor Grid
Status Legend :
| Icon | Status | Description |
|---|---|---|
| ✅ | Completed | Successfully deployed |
| ❗ | Pending | Awaiting action |
| ⚠️ | Partial | Some items failed |
| ❌ | Failed | Deployment failed |
| ⚙️ | Running | Currently executing |
✅ Completed - This icon indicates the Import has completed successfully.
❗ Pending - This icon indicates the Import has an action pending, but the Import will finish once the pending action is complete.
⚠️ Partial - A partial status is indicated when some metadata have been imported, but other lines have failed to import. To change from Partial status to Complete, the failed line on the import must be fixed and the Import ran again or the Import must be manually Closed.
❌ Failed - This icon will indicate the Import has failed and will not finish without user intervention.
⚙️ Running - This icon will indicate the import is currently running.
Monitor Features
Filtering and Search

Filter options for monitor
Filter Options:
- Start Date
- End Date
- Execution ID
- Status
Auto-Refresh
Enable automatic grid updates:
- Default: 60 seconds
- Configurable in Global Settings
- Manual refresh button available
Log Analysis
Access detailed logs:
- Click log icon in grid
- Review log sections:
- Initialization
- Validation results
- Record processing
- Error details
- Performance metrics
Log Example:
[2024-03-15 10:30:00] INFO: Starting import GL_ACCOUNT_IMPORT
[2024-03-15 10:30:01] INFO: Found 1,234 records to process
[2024-03-15 10:30:02] INFO: Validation passed
[2024-03-15 10:30:05] INFO: Created request REQ-2024-0315
[2024-03-15 10:30:10] INFO: Processed 1,234 records successfully
[2024-03-15 10:30:11] INFO: Import completed
ERP Integration
Oracle EBS Integration
For Oracle E-Business Suite integration:
Configuration Requirements
-
Database Objects (See Appendix E)
-
Interface views
- PL/SQL packages
-
Concurrent programs
-
EPMware Configuration
Interface Name: EBS_GL_IMPORT Interface Table: xxps_gl_interface_v Pre-Script: VALIDATE_EBS_GL -
Mapping Example
-- Header Mapping
LEDGER_NAME → UDF1
PERIOD_NAME → UDF2

-- Line Mapping
SEGMENT1 → Entity
SEGMENT2 → Account
SEGMENT3 → Product
Scheduling and Automation
Scheduled Imports
Configure automatic import execution:

Schedule configuration options
Schedule Types:
- Immediate - Run on file upload
- Daily - Fixed time each day
- Weekly - Specific days
- Monthly - Day of month
- Interval - Every X hours/minutes
Automation Best Practices
- Off-Peak Processing - Schedule during low usage
- Incremental Loads - Process only changes
- Error Recovery - Auto-retry failed records
- Notification Chain - Alert on success/failure
- Archive Strategy - Clean up processed data
Best Practices
1. Data Quality
- Source Validation - Check data before import
- Required Fields - Enforce mandatory attributes
- Format Standards - Consistent codes/formats
- Duplicate Detection - Prevent redundant imports
- Referential Integrity - Validate relationships
2. Performance Optimization
- Batch Sizing - Optimal record counts
- Index Usage - Index interface tables
- Parallel Processing - Multiple concurrent imports
- Memory Management - Configure heap sizes
- Archive Old Data - Maintain performance
3. Error Handling
- Partial Loads - Allow continuation on error
- Error Logging - Detailed error capture
- Retry Logic - Automatic retry for transient errors
- Notification - Alert on failures
- Recovery Procedures - Document recovery steps
4. Security
- Access Control - Restrict import configuration
- Data Encryption - Secure sensitive data
- Audit Trail - Log all import activities
- Credential Management - Secure storage
- Data Masking - Hide sensitive values
Troubleshooting
Common Issues
| Issue | Cause | Solution |
|---|---|---|
| Import not starting | Service stopped | Start ERP Import Service |
| Records not found | Wrong interface table | Verify table name |
| Mapping errors | Property mismatch | Check dimension properties |
| Validation failures | Data quality issues | Review pre-execution script |
| Timeout errors | Large dataset | Increase timeout, reduce batch |
| Duplicate imports | Multiple executions | Check execution history |
| Workflow not launching | Configuration issue | Verify workflow setting |
Performance Tuning
- Global Settings - Adjust timeouts and intervals
- Database Indexes - Add indexes on interface tables
- Batch Size - Optimize record count per execution
- Memory Allocation - Increase JVM heap if needed
- Parallel Processing - Configure multiple import threads
Related Topics
- Administration Services - Manage ERP Import Service
- Workflow Builder - Configure import workflows
- Logic Builder - Create validation scripts
- Email Templates - Import notifications
- Global Settings - System parameters
- Appendix B: Oracle Fusion GL - Fusion integration guide
- Appendix E: Oracle EBS GL - EBS integration guide