Administration
The Administration module is used by the Administrator to monitor Services and create metadata Export files. The Administration module is comprised of the following components:
- Services
- Application Migration
Services
The Services page is located at Administration → Services and has the current status of the EPMware Services. The Deployment, ERP Import and Workflow services can be Stopped and Started from this page.

Services status and control panel
Application Migration
The Migration module is located at Administration → Migration and allows applications and application artifacts to be exported to an XML file. This provides the ability to migrate applications and individual artifacts from one environment to another. The Migration page has three tabs which are used to create and execute artifact exports.
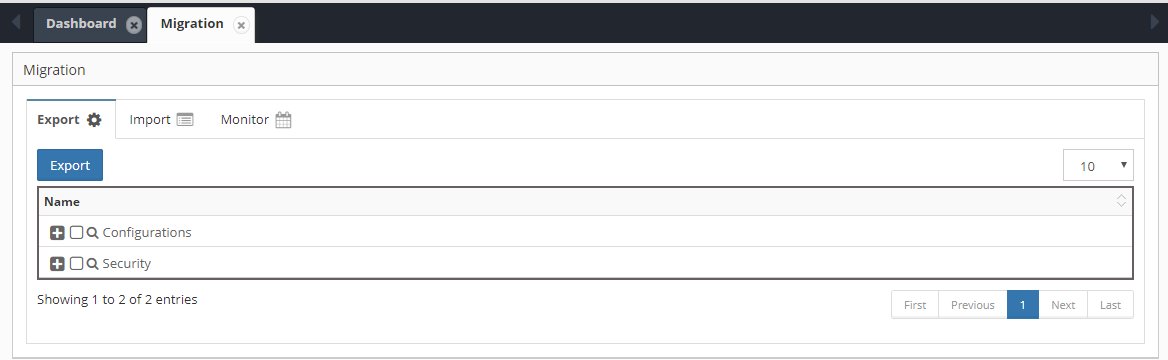
Migration module with Export, Import, and Monitor tabs
The Migration module consists of the following components:
- Export – Artifacts are selected for export
- Import – Artifact files are uploaded, validated and imported
- Monitor – Monitor Export and Import jobs and download export files
Migration Process
To migrate from one environment to another:
- Export the artifacts from the source environment and download the XML file
- Import the file downloaded from the source environment into the target environment:
- Upload the file
- Validate the file
- Import the file
Export
Export artifacts from the source environment:

Export artifact selection tree
To Export Artifacts
- Select the Export tab
- Select the artifacts to export:

Artifact selection for export
- Click the Export button to execute the export
- Select the Monitor tab to check the status of the export and to download the export file
Import
Import artifacts into the target environment:

Import configuration screen
To Import Artifacts
- Select the Import tab
- Choose Merge or Replace
- Browse to select the XML file to import:

Upload migration file dialog
- Click the Upload button to upload the file
- Click the Validate button to check the file for errors
- Review validation results:
- Click the Import button to execute the import
- Select the Monitor tab to check the status of the import
Note
The artifacts to be imported can be viewed after the upload has completed.
Import Options
| Option | Description | Use Case |
|---|---|---|
| Merge | Preserves existing, adds new | Incremental updates |
| Replace | Complete replacement | Clean slate import |
| Skip Errors | Continue on error | Partial imports |
| Backup First | Auto-backup before import | Safety measure |
Monitor
Track migration job status and download files:
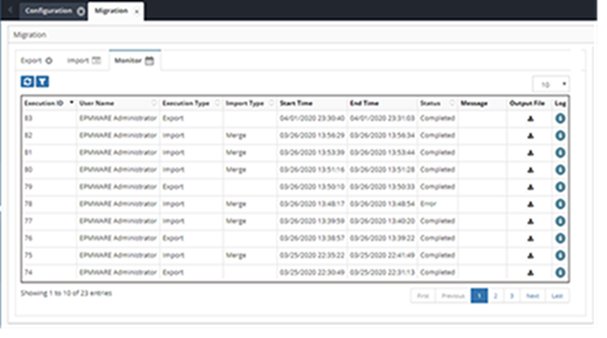
Migration monitor showing job history
Each Import and Export will have an Execution ID and display as a row in the grid.
Monitor Grid
| Column | Description |
|---|---|
| Execution ID | Unique job identifier |
| User Name | Name of the user who executed the process |
| Execution Type | Export or Import |
| File Name | Export or Import FileName |
| Import Type | Merge or Replace |
| Start Time | Job start timestamp |
| End Time | Completion timestamp |
| Status | Running/Completed/Failed |
| Message | Success or error message |
| Output File | Download link |
| Log | View log file |
To Download the Import or Export File
- Select the download icon in the Output File column
- Click the icon in the row on the grid to download the file
- Click the icon in the Log column to download the Log file
Monitoring Actions
- Download Files – Click file icon to download
- View Logs – Click log icon for details
- Filter Results – Use search/filter options
- Refresh Status – Auto-refresh or manual
Migration Example
The following is an example of a typical migration from UAT to Production. We will be migrating:
- The HFM application Properties and Dimensions
- All the Workflows
- All the Dimension Mappings
- All the Logic Scripts, Email Templates, Lookups, Exports, ERP Imports and UDF Settings
- The HFM application metadata and the Backup Enabled Custom Properties
We will exclude:
- Infrastructure – Production will be different
- Environments – We do not have a multi-environment configuration
- Security – Production security will be different
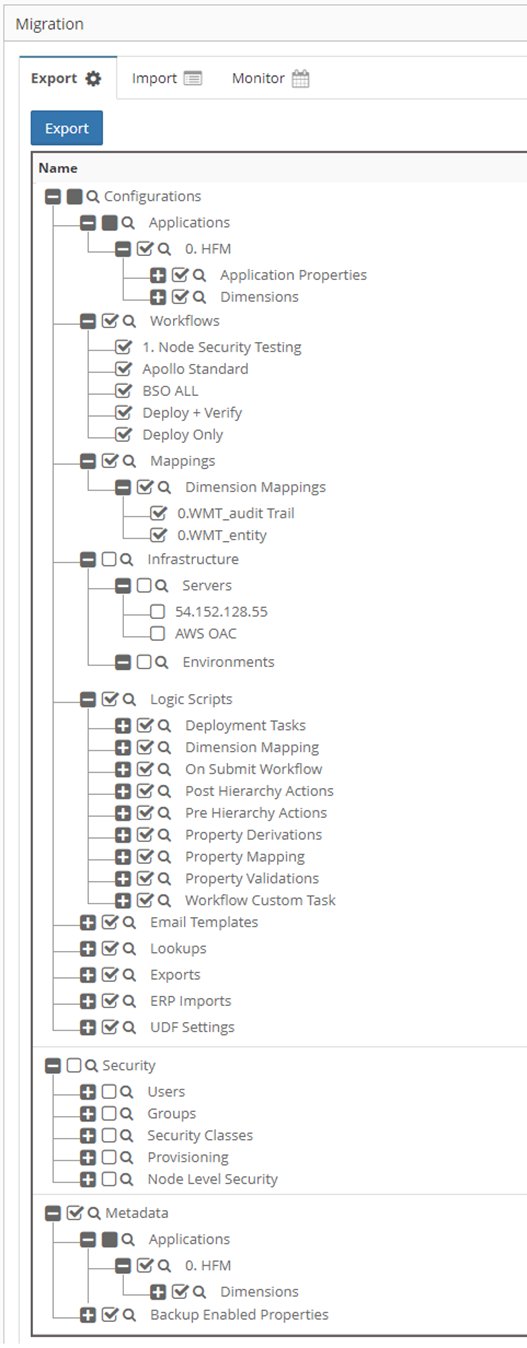
Object selection example for UAT to Production migration