Application Configuration
Application Configuration is the central hub for connecting EPMware to your target EPM systems. This module enables you to register applications, import metadata hierarchies, configure deployment settings, and manage application-specific properties for seamless integration with HFM, Planning, Essbase, PBCS, TRCS, FCCS, OneStream, and other supported platforms.
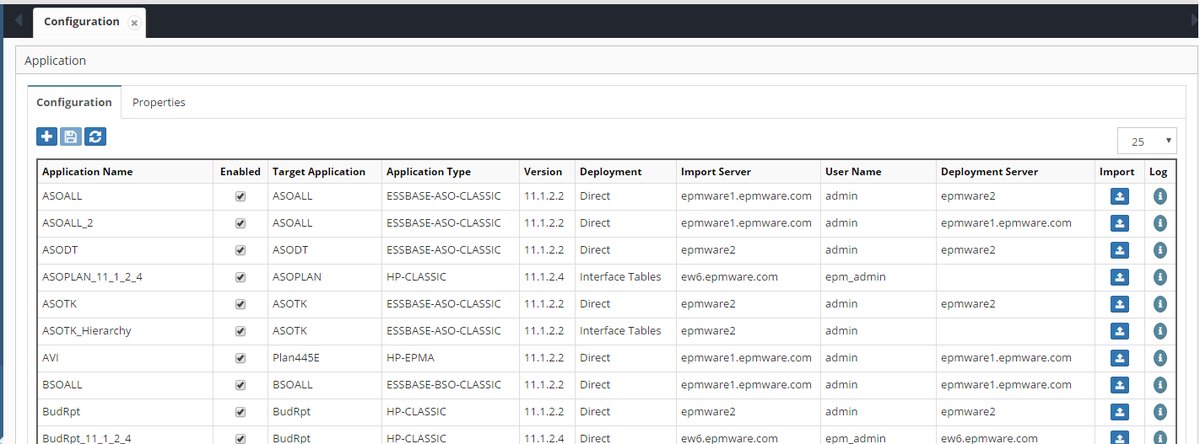
Application configuration screen showing registered applications
Overview
Each EPMware application represents a target system where metadata will be deployed. Application configuration establishes the connection between EPMware and these target systems, imports existing metadata structures, and defines how metadata changes will be deployed. Proper application setup is essential for accurate metadata management and reliable deployments.
Application Configuration Components
Application Registration
Application registration creates the foundation for metadata management by linking EPMware to target EPM systems. Each application entry defines the connection details, deployment method, and security controls.
Key Registration Elements:
- Application Name - User-defined name for the EPMware application
- Target Application - Physical application name in the target system
- Application Type - Target platform (HFM, Planning, Essbase, PBCS, TRCS, Generic, etc.)
- Version - Target application version for compatibility
- Security Class - Controls user access to the application
- Deployment Method - Direct deployment, file-based, or interface table
- Server Configuration - Import and deployment server assignments
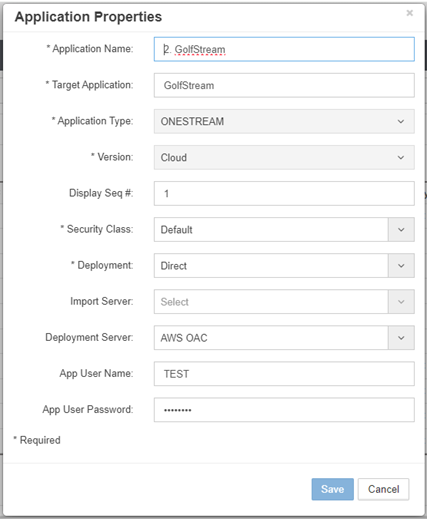
Application registration dialog with configuration options
Application Create and Import
Create an Application
Creating an application establishes the EPMware representation of your target system and prepares it for metadata import.
-
Select the + icon to display the Add Application popup.
-
Configure the application settings:
- Application Name - User-defined name for the application
- Target Application - Target application name in the EPM system
- Application Type - Select from supported types (HFM, Planning, Essbase, PBCS, etc.)
- Version - Target application version
- Display Sequence - Order for display in dropdowns
- Security Class - Assign security access control
- Deployment Method - Select Direct, File, or Interface Table
- Import Server - Server for metadata import
- Deployment Server - Server for metadata deployment
- Target Application User Name - Authentication username
-
Target Application Password - Authentication password
-
Select Save to create the application.
Application Properties Required
Application Properties must be configured before importing metadata from the target application. See Application Properties below.
Import Target Application Hierarchies
EPMware can automatically import existing metadata hierarchies from target applications, providing a complete view of your current metadata structure.
Import Methods by Application Type:
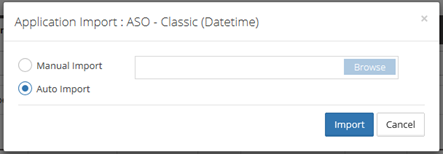
Essbase:
-
Auto Import from target application
-
Manual Import of XML export file:- Generate XML:
Export outline ASOALL.Basic all dimensions to xml_file "c:/temp/ASOALL02.xml";
Planning:
-
Auto Import from target application
-
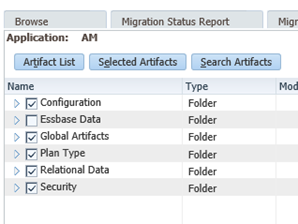
Manual Import of LCM Extract .zip file: Create LCM Extract with the following artifacts:
- Import the "LCM Extract .zip" file
HFM
-
Auto Import from target application
-
Manual Import of Metadata Extract XML file (Note: .app files cannot be imported)
PBCS/FCCS/TRCS/ARCS/PCMCS/OAC (Oracle EPM Cloud) - Auto Import from target application - See Appendix A for cloud configuration requirements
OneStream - See Appendix D for configuration details
Generic Application
- Manual Import of CSV files - Compress the following files using WinZip:
<TARGET_APP_NAME>_Props.csv<TARGET_APP_NAME>_Dim_Classes.csv<TARGET_APP_NAME>_Dimensions.csv<TARGET_APP_NAME>_Dim_Props.csv<TARGET_APP_NAME>_Dim_Class_Props.csv<TARGET_APP_NAME>_<Dim_Name>_Hierarchies.csv<TARGET_APP_NAME>_<Dim_Name>_Members.csv<TARGET_APP_NAME>_Lookups.csv
Note
A Generic application can also be configured using Application, Dimension and Property Configuration and no import is necessary.
Generation Format - All Generic Application Types support importing metadata from files with a Generations format. To enable this feature:
-
Set Application Properties before loading metadata:
- Change
GENERATION_FORMAT_APP_IMPORTfrom defaultNtoY - Configure prefix/suffix (optional) based on file headers:
GENERATION_MEMBER_COLUMN_PREFIXGENERATION_MEMBER_COLUMN_SUFFIX
- Change
-
File Header Format:
- Use default prefix/suffix or modify EPMware properties to match file headers
- Generation # is derived after removing prefix and suffix values
- Example headers:
GENERATION_1_MEMBER_NAME,GENERATION_2_MEMBER_NAME

Application properties for Generation format import
- Member Properties Configuration:
- Property column suffix becomes the Property Name
- Example: Description Property with
DESCas Property Name

Property configuration showing DESC as Property Name
- File should have columns: `GENERATION_1_DESC`, `GENERATION_2_DESC`, etc.
Generation Format Example
CSV File Structure:

Example CSV file with Generation format structure
Dimension Column
The Dimension column is mandatory and requires a fixed header name to identify the Dimension Name.
Import Result:

Metadata Explorer showing results after Generation format import
Oracle Fusion GL - Manual Import of Excel and hierarchy files - See Appendix B for configuration
Oracle EBS GL - Manual Import of CSV hierarchy and value set files - See Appendix E for configuration
Import Procedure
-
Select the upload icon in the application grid row.
-
Choose import method:
- Auto Import - Import directly from target application server
-
Manual Import - Browse and upload metadata file
-
Select the appropriate file format based on application type.
-
Monitor the import progress bar.
-
Review the Application Import Status popup when complete.
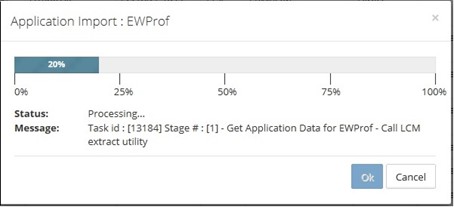
Application import progress screen

Application import status showing successful dimension import
Monitoring Import Progress
Click the info icon in the grid to redisplay the Application Import Status popup and check progress or view import logs.
Application Properties
Application Properties define target-specific configuration parameters that control how EPMware interacts with each application type. These properties must be configured before importing metadata or deploying changes.
Select the Application Properties tab -> Select the Application Name to configure from the drop down

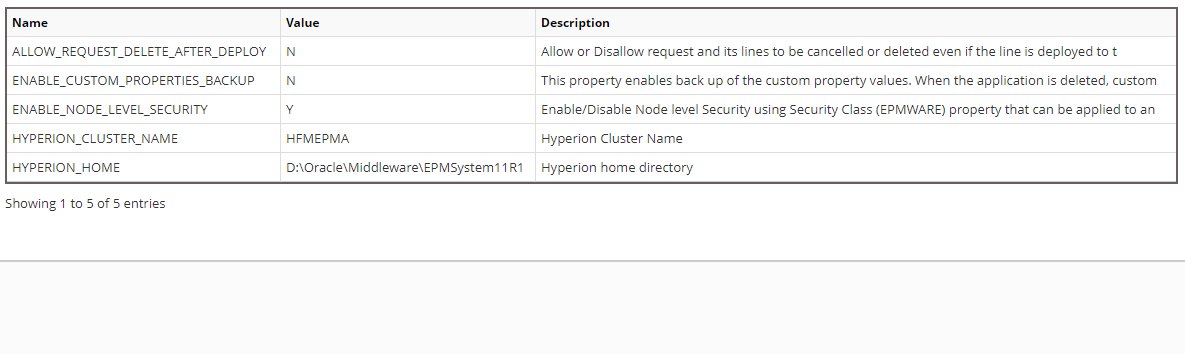
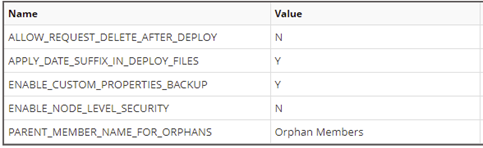
Common Application Properties
Common across all applications:
ALLOW_APPLICATION_IMPORT- Enable/Disable Application Import. (Y/N)ALLOW_APPLICATION_DELETE- Enable/Disable Delete of Application.(Y/N)ALLOW_APPLICATION_DELETE_METADATA- Enable/Disable Delete of Application Metadata Only.(Y/N)ALLOW_REQUEST_DELETE_AFTER_DEPLOY- Allow request deletion after deployment (Y/N)ENABLE_CUSTOM_PROPERTIES_BACKUP- Backup custom properties before deployment (Y/N)ENABLE_NODE_LEVEL_SECURITY- Enable member-level security (Y/N)ALLOW_LOCKED_MEMBERS_IN_DIFF_REQUESTS- Allow users to work on locked members in multiple requests
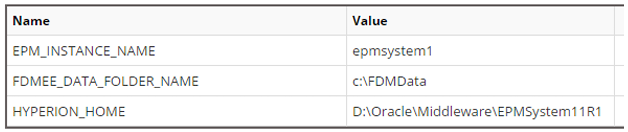
HFM Application Properties
Configure HFM-specific properties for on-premise deployments:
HYPERION_CLUSTER_NAME- HFM cluster nameHYPERION_HOME- Hyperion Home directory path on application serverEPM_INSTANCE_NAME- Hyperion EPM Instance name
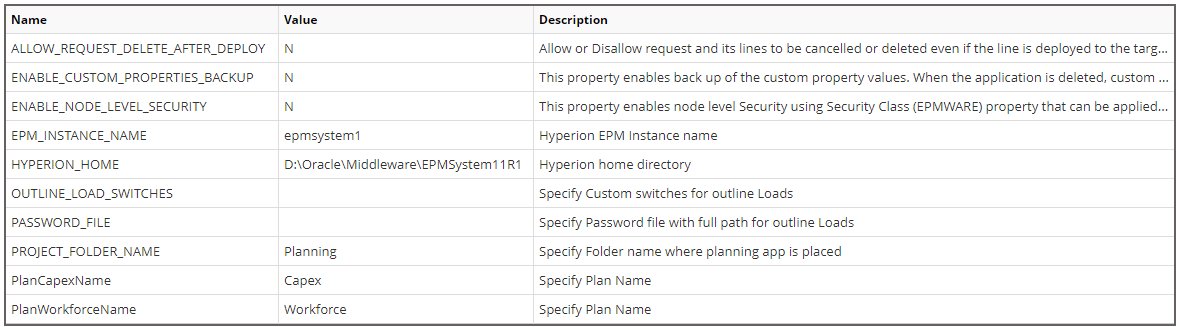
Planning Application Properties
Configure Planning-specific properties for on-premise deployments:
EPM_INSTANCE_NAME- Hyperion instance nameHYPERION_HOME- Hyperion Home directory pathOUTLINE_LOAD_SWITCHES- Custom outline load switches (e.g., /IDU)PASSWORD_FILE- Path to Hyperion password file (pwd.txt)PROJECT_FOLDER_NAME- Shared Services project folder namePlanCapexName- Capex Plan name (if applicable)PlanWorkforceName- Workforce Plan name (if applicable)
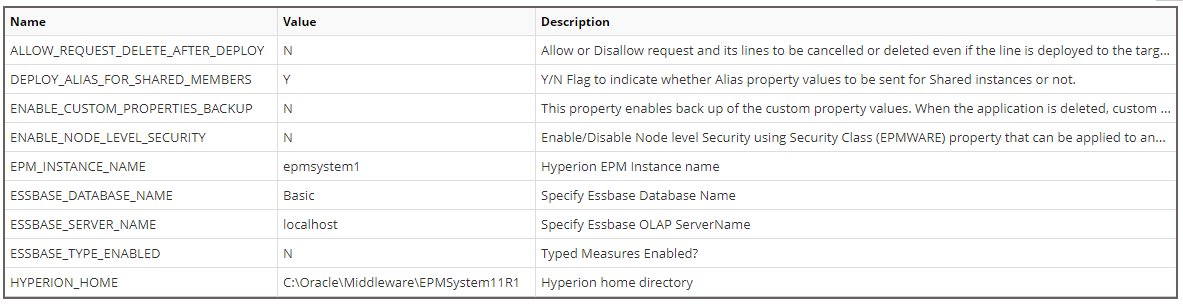
Essbase Application Properties
Configure Essbase-specific properties:
EPM_INSTANCE_NAME- Hyperion instance nameESSBASE_DATABASE_NAME- Essbase database nameESSBASE_SERVER_NAME- Essbase server nameESSBASE_TYPE_ENABLED- Enable typed measures (Y/N)HYPERION_HOME- Hyperion Home directory pathDEPLOY_ALIAS_FOR_SHARED_MEMBERS- Deploy aliases for shared members (Y/N)
Oracle EBS Application Properties
Configure Oracle EBS GL properties:

Configure Oracle PBCS Application Properties
Configure Oracle Planning and Budgeting Cloud Service or Financial Consolidation Cloud Service:
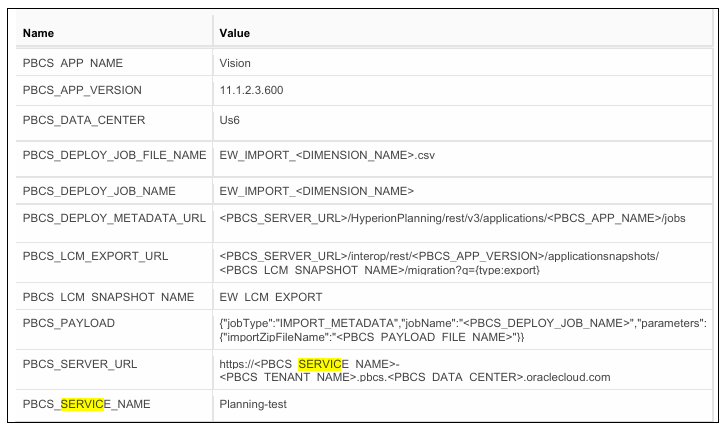
PBCS_APP_NAME- Cloud application name (e.g., "Vision")PBCS_APP_VERSION- Oracle REST API version (default: 11.1.2.3.600)PBCS_DEPLOY_JOB_FILE_NAME- Import job CSV filenamePBCS_DEPLOY_JOB_NAME- Import job name created in PBCSPBCS_DEPLOY_METADATA_URL- REST API deployment endpointPBCS_LCM_EXPORT_URL- REST API export endpointPBCS_LCM_SNAPSHOT_NAME- Snapshot name (e.g., "EW_LCM_EXPORT")PBCS_SERVER_URL- Cloud service URLPBCS_TENANT_NAME- Oracle cloud tenant namePBCS_DATA_CENTER- Data center location (e.g., "us2")PBCS_SERVICE_NAME- Service name (e.g., "planning-test")
PBCS Configuration Prerequisites
Before configuring PBCS properties, ensure the import job and snapshot are created in the target PBCS application. See Appendix A for detailed setup instructions.
URL Configuration
Server URL Format
https://<SERVICE_NAME>-<TENANT_NAME>.pbcs.<DATA_CENTER>.oraclecloud.com
Example URLs
| Service | URL Pattern |
|---|---|
| PBCS | https://planning-test-abc123.pbcs.us2.oraclecloud.com |
| FCCS | https://consolidation-abc123.fccs.us6.oraclecloud.com |
| TRCS | https://tax-abc123.trcs.us2.oraclecloud.com |
Testing & Validation
Connection Testing
- Test Server Connection
Configuration → Infrastructure → Servers
- Select cloud server
- Click "Test Connection"
- Verify success message
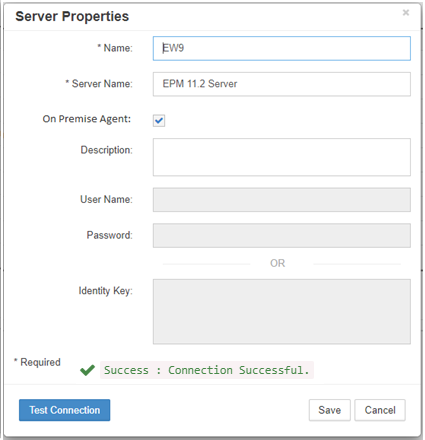
Test connection dialog showing successful connection
- Import Test
- Use Application Import with Auto Import
- Verify hierarchies load correctly
- Check import status and logs
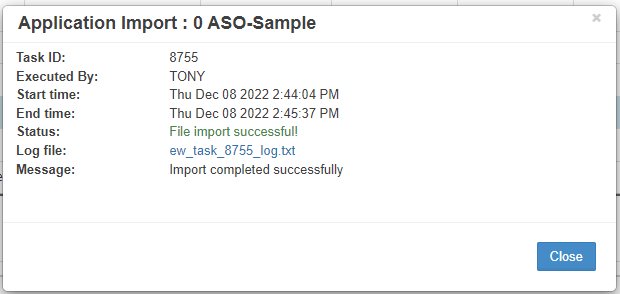
Application import status showing successful hierarchy import
- Deployment Test
- Create test request with minimal changes
- Deploy through workflow
- Verify in target application
Validation Checklist
- [ ] Server connection successful
- [ ] LCM snapshot accessible
- [ ] Import jobs created for all dimensions
- [ ] Application properties configured
- [ ] Test import completes successfully
- [ ] Test deployment updates target
- [ ] Audit logs capture activities
Configure Oracle FCCS Application Properties
FCCS Special Configuration
Additional properties for HFM to FCCS migrations:
| Property | Description | Example |
|---|---|---|
HFM_LEGACY_DIM_MAP_ACCOUNT |
FCCS Dimension mapped to HFM Account dimension when imported | Account |
HFM_LEGACY_DIM_MAP_ENTITY |
FCCS Dimension mapped to HFM Account dimension when imported | Entity |
HFM_LEGACY_DIM_MAP_CUSTOM1 |
FCCS Dimension mapped to HFM Account dimension when imported | Product |
HFM_LEGACY_DIM_MAP_CUSTOM2 |
FCCS Dimension mapped to HFM Account dimension when imported | Location |
HFM_LEGACY_TOP_NODE_PREFIX |
Top Node where HFM nodes will be inserted for dimensions migrated from HFM application | HFM_Legacy_ |
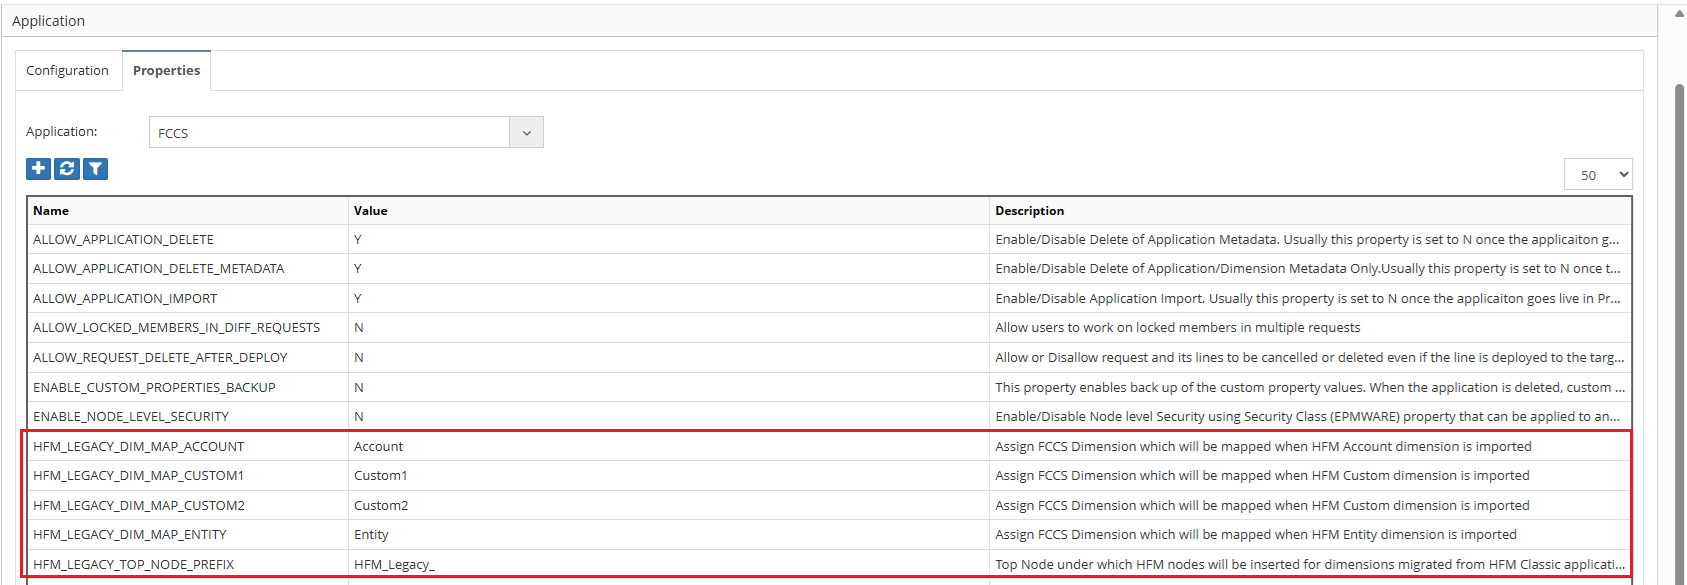
FCCS-specific properties for HFM migration
PCMCS Configuration
PCMCS Deployment
PCMCS deployments are handled through the EPMware Agent. No import job configuration is required in PCMCS.
Key differences: - No import job setup needed - Agent-based deployment - Supports POV-specific deployments
Troubleshooting
Common Issues & Solutions
| Issue | Error Message | Solution |
|---|---|---|
| Connection Failed | HTTP 401 Unauthorized | Verify username/password and user permissions |
| Bad Request | HTTP 400 Bad Request | Check application name, data center, and URL format |
| Forbidden | HTTP 403 Forbidden | User lacks required application role |
| Import Timeout | Timeout exceeded | Increase timeout in Global Settings |
| Job Not Found | Import job not found | Verify job name matches exactly (case-sensitive) |
Debug Checklist
- Verify Credentials
- Test login directly in Oracle EPM Cloud
- Confirm user has Service Administrator role
-
Check password for special characters
-
Validate URLs
- Confirm data center code
- Verify tenant name
-
Check service name
-
Review Job Configuration
- Confirm file names are uppercase
- Verify .csv extension is lowercase
- Check "Clear Members" is enabled
OneStream Application Properties
Configure OneStream-specific properties for REST API integration:
Token Generation Options:
Option 1: Okta Authentication
The following Property values will be provided by the Okta Single Sign On Administrator :
OS_REST_API_CLIENT_ID- Okta M2M Client IDOS_REST_API_CLIENT_SECRET_KEY- Okta M2M Secret KeyOS_REST_API_SCOPE- Okta Scope NameOS_REST_API_URL- Okta URL with authorization server IDOS_REST_API_USERNAME- OneStream API user (e.g., "REST API")
Option 2: OneStream Identity Server (OIS)
OS_REST_API_TOKEN- Personal Access Token from OISOS_REST_API_USERNAME- OneStream API user
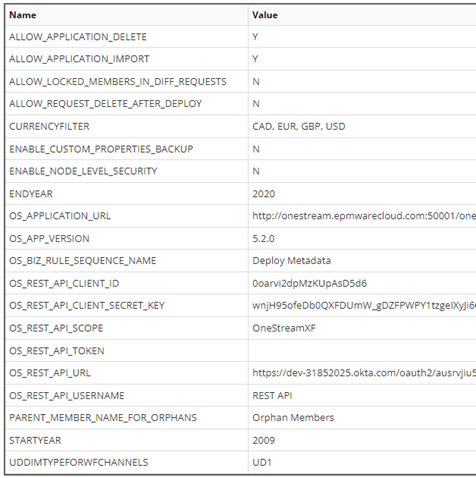
OneStream application properties
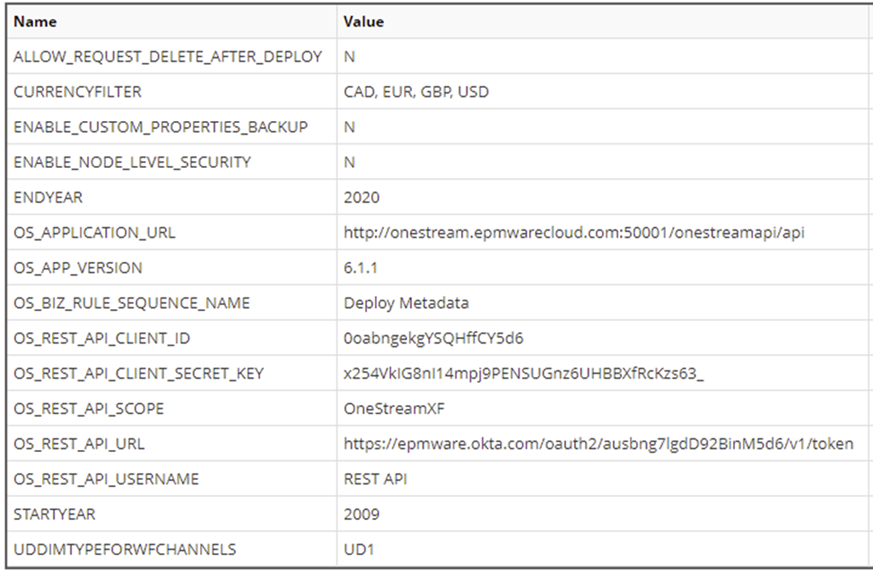
OneStream application properties
Under User Security Authentication in OneStream assign the following to the REST API user:
• External Authentication Provider: Okta
• External Provider User Name: Okta M2M Client ID
• Internal Provider Password: Okta M2M Client Secret Key
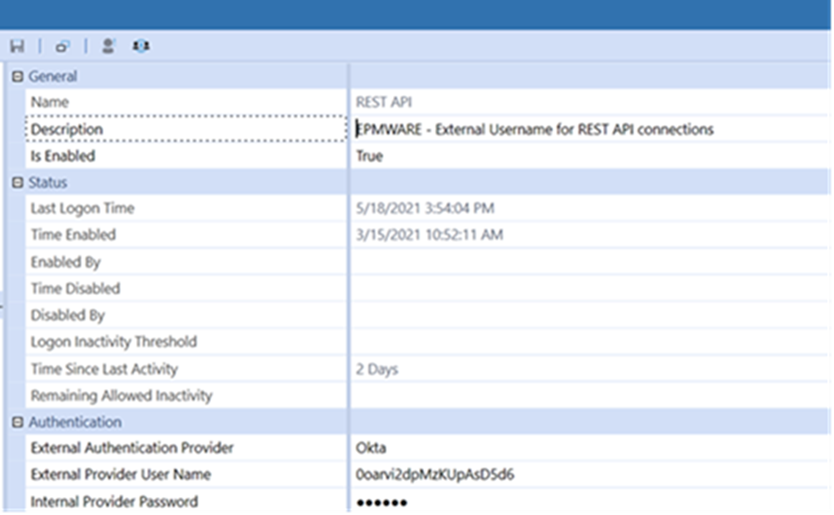
OneStream application properties with REST API configuration
Configure FDMEE Application Properties
Oracle EBS GL Properties
Configure Oracle EBS GL properties:
Custom Application Properties
Administrators can add custom properties for internal use or integration purposes.
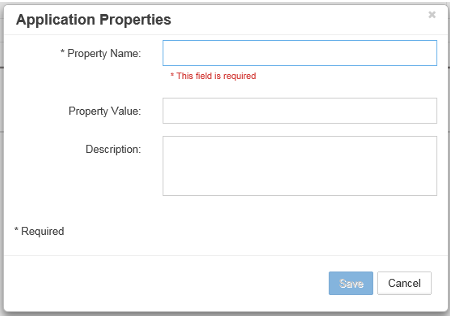
To Add a Custom Property
-
Select the + icon to display the Add Properties popup.
-
Input the Property Name, Property Value, and Description.
-
Select Save to create the property.
To Edit a Custom Property
-
Right click on a row and select Properties from the Menu to display the Application Properties popup box.
-
Edit the properties as required.
-
Select Save to save the changes.
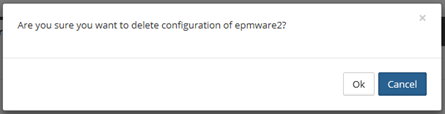
To Delete a Custom Property
-
Right click on a row and select Delete from the Menu.
-
The following confirmation popup will display
-
Select OK to delete the Property
Application Import Errors
Common application import errors and resolutions:
HTTP 400 Bad Request (PBCS) - Check Application Properties for correct PBCS Application Name, Data Center, Service Name, and Application URL
HTTP 401 Unauthorized - Verify application username and password are correct - Ensure user has appropriate permissions in target application
HTTP 403 Forbidden - User authentication failed - Check credentials and user security in target system
Import Timeout - Increase timeout values in Global Settings - Check network connectivity to target application - Verify application server is accessible
Import Prerequisites
Ensure the target application is accessible, user credentials are valid, and all required application properties are configured before attempting an import.
Application Management
Edit an Application
-
Right-click on a row and select Properties from the menu.
-
Edit the properties as required.
-
Select Save to save the changes.
Application Properties
Some application properties can only be edited on the Properties tab, not in the main application dialog.
Enable/Disable an Application
-
Select the Enabled checkbox in the grid to enable the application.
-
Deselect to disable the application.
-
Select the save icon to save the change.
Tip
Disabling an application prevents it from appearing in user dropdowns but preserves all configuration and metadata.
Delete an Application
-
Right-click on a row and select Delete from the menu.
-
Confirm the deletion in the popup.
-
Select OK to delete the application.
Deletion Warning
Deleting an application removes all associated dimensions, properties, and metadata. This action cannot be undone. Consider disabling the application instead.
Application Configuration Workflow
Follow this recommended workflow when configuring a new application:
Phase 1: Application Setup
- Configure Infrastructure - Ensure target server is configured in Infrastructure
- Create Application - Register the application in EPMware
- Configure Application Properties - Set target-specific properties
- Test Connection - Verify connectivity to target application
Phase 2: Metadata Import
- Prepare Target System - Configure target application for import (if required)
- Import Hierarchies - Import metadata from target application
- Review Import Status - Check for errors and validate import
- Verify Dimensions - Confirm all dimensions imported correctly
Phase 3: Configuration Refinement
- Configure Dimension Properties - Set dimension-specific settings
- Configure Member Properties - Define property attributes and categories
- Set Up Mappings - Map dimensions and properties across applications
- Configure Security - Assign security classes to application and dimensions
Best Practices
- Always test imports in a non-production environment first
- Document custom properties and their purposes
- Maintain consistent naming conventions across applications
- Regular backups of application configuration before major changes
Related Topics
- Infrastructure Configuration - Configure servers for application connectivity
- Dimension Configuration - Set up dimension structure and mappings
- Member Properties - Configure metadata properties
- Deployment Manager - Deploy metadata to target applications
- Appendices - Target application-specific configuration guides
Quick Links
-
Create Application
Register a new target application in EPMware
-
Import Metadata
Import hierarchies from target applications
-
Configure Properties
Set application-specific properties
-
Troubleshoot Import
Resolve common import errors